

Easy and Fun Nature Walk Bracelets for Kids
Are you looking for more ways to get your kids outside having fun? If you’re like me, the answer is pretty much always yes. We recently spent some time outside making these nature walk bracelets, and it was fun, easy, and they turned out really pretty!

DISCLOSURE: THIS POST MAY CONTAIN AFFILIATE LINKS, MEANING I GET A COMMISSION IF YOU DECIDE TO MAKE A PURCHASE THROUGH MY LINKS, AT NO COST TO YOU. PLEASE READ MY TERMS OF USE POLICY FOR MORE INFO.
Preparing Your Bracelets
The only material you need for this activity is clear packing tape (get some here if you don’t have any at home!). And setup is ridiculously easy, too - create your child’s bracelet by putting the tape inside out around their wrist. You want the sticky part of the tape facing out, NOT toward their skin.

Aside from your packing tape bracelets, my five year old decided to bring a magnifying glass out with us, and that was a fun addition, too! (If you want to be really extra, this Kids’ Explorer Kit from Amazon looks really fun and is well priced.)
Decorating Your Nature Bracelets
All you need to do to create a beautiful bracelet is find different nature elements and stick them on your bracelet!

We headed outside and barely made it past the front door when both of my girls spotted some flowers and started investigating. Ella whipped out her magnifying glass to get a closer look, and Ruthie (my 17 month old) was intrigued by all of the different textures.

17 month old Ruthie working on her nature bracelet, with her favorite plastic french fry in tow. ;)
Not surprisingly, Ruthie’s bracelet didn’t last long. I helped her take it off after about three minutes, and she was happy to walk around exploring on her own.

Ella and I had fun finding different colored flowers in our yard, and I love how she arranged them, along with some leaves for variety!


These bracelets obviously aren’t meant to be worn long-term, so when we came inside, Ella cut hers off and laid it out flat in her room. It looks beautiful laid out, too! The wheels are already turning in my head - maybe we’ll turn this into a bookmark!

Download my Free Nature Scavenger Hunt

If you’re looking for more fun ways to play in nature, this activity pairs perfectly with my nature scavenger hunt activity, which you can read about here and then download your own for FREE! Just enter your email below and I’ll send it right to your inbox!

Seashell Watercolor Painting (The Best Beach Activity for Kids!)

Did you know if you bring your watercolor paints with you on your next beach trip, you can paint seashells… right ON the beach? This activity is so fun and it couldn’t be any easier!
DISCLOSURE: THIS POST MAY CONTAIN AFFILIATE LINKS, MEANING I GET A COMMISSION IF YOU DECIDE TO MAKE A PURCHASE THROUGH MY LINKS, AT NO COST TO YOU. PLEASE READ MY TERMS OF USE POLICY FOR MORE INFO.
This past weekend we spent the day at the beach, and I made sure to pack our watercolor paints (don’t go fancy or expensive here - something cheap like this is perfect). With two kids in tow, we had a whole car full of beach equipment, but for this activity, the watercolor paint set is really all you need!
(I will share some of our other beach must-haves at the end, though, so keep reading!)
Painting Seashells
We started by collecting shells. A nice variety of shapes, sizes, and colors makes this activity even more interesting!

I poured a small amount of water (straight from the gulf) into the paints. Even though we had used this paint set at the beach in the past and it looked dried out, the little bit of water was all we needed to revive the paints!

Ella (5) set to work painting her shells. The colors were so vibrant! It was the perfect mix of art project, relaxing activity, and sensory experience.

After she was done painting, Ella made a “pie” in the sand and decorated it with her colorful shells. I love when art projects lead to imaginative play!
Our Beach Must Haves
If you’re heading to the beach anytime soon (especially with kids), you’re going to want these items with you!

Beach tent - we only got ours last summer and I have no idea why we waited as long as we did! Make sure to get this kind that is all-in-one and easy to set up. We LOVE ours from Sam’s Club!
Beach wagon - we got this one from Sam’s Club too and it has been fantastic. A must-have for the beach, and also perfect for family walks around our neighborhood at home!
These kids’ camping chairs from Walmart. At $10 each these were a steal and our two girls are so happy to each have their own chair on the beach!
Beach toys - a no-brainer, but if you don’t have a good set of beach toys yet, don’t forget to stock up!
Catch-and-release aquarium - **I can’t call this one a must-have because we don’t have one, yet! So this isn’t a personal recommendation… But I have seen this idea on Instagram and it’s so fun! Use this aquarium to catch sea life, observe, and then return it safely to the water!
Speaking of Instagram, if you try painting seashells at the beach, will you head over to Instagram and tag me there? I would love to see how yours turn out! Or comment below and tell me about your experience!
**In this post I shared links to products from Walmart and Sam’s Club. We have a Walmart+ subscription and a Sam’s Club membership, and I cannot recommend either enough! As someone who is pretty frugal, I don’t just sign up for every membership I see… but these are two that have saved my family so much time and money. You can sign up for Walmart+ here or Sam’s Club here. You won’t regret it!

Fun Creation Story Activities For Kids

I don’t know about you, but I’m always on the hunt for new ideas to teach my two girls, Ella and Ruthie, about God. I know that teaching my children about the Bible is one of the most important things I do, period.
DISCLOSURE: THIS POST MAY CONTAIN AFFILIATE LINKS, MEANING I GET A COMMISSION IF YOU DECIDE TO MAKE A PURCHASE THROUGH MY LINKS, AT NO COST TO YOU. PLEASE READ MY TERMS OF USE POLICY FOR MORE INFO.
We recently worked on some fun activities to learn about the Creation story - how God created the Earth in seven days. Ella (5) loves to color and create, so choosing these activities was pretty much a no-brainer!
Our Storybook Bible

Whenever we are learning about a new Bible story, I first pull out our favorite storybook Bible. We have this one and we love it. We read about the story of Creation and how God created the world.
Days of Creation Mini-Book

Next, I printed the black and white version of the mini-book from my printable pack, and Ella and I colored it together and put it together. We read the story and talked about each day.
Creation Wheel Craft

The next activity we did together was the wheel craft. Again, I decided to print the black and white version, because I figured it was more fun for Ella to get to color. She loved spinning the wheel and retelling the story that way!
Creation Sequencing Activity

After that, I printed the cut-and-paste sequencing activity for Ella to work on. She colored, cut out the pictures, and pasted them in order. She was able to do this pretty independently since we had talked about the story so much already!
(There’s also a sequencing activity in worksheet form in this set, but that would be a bit above Ella’s head. It’s important to know your kiddo and do what works for them!)
Days of Creation Matching Game

Finally, we played the Days of Creation matching game. I printed this one in color just for something different, and we glued each cut out card to construction paper so we couldn’t see through the paper. We laid the cards out face down and took turns picking two cards, looking for matches. This was really fun (we laughed a lot) and was a perfect review to our whole Days of Creation “unit”!
Looking for more Bible lessons and activities to do with your little ones? Check these out!:
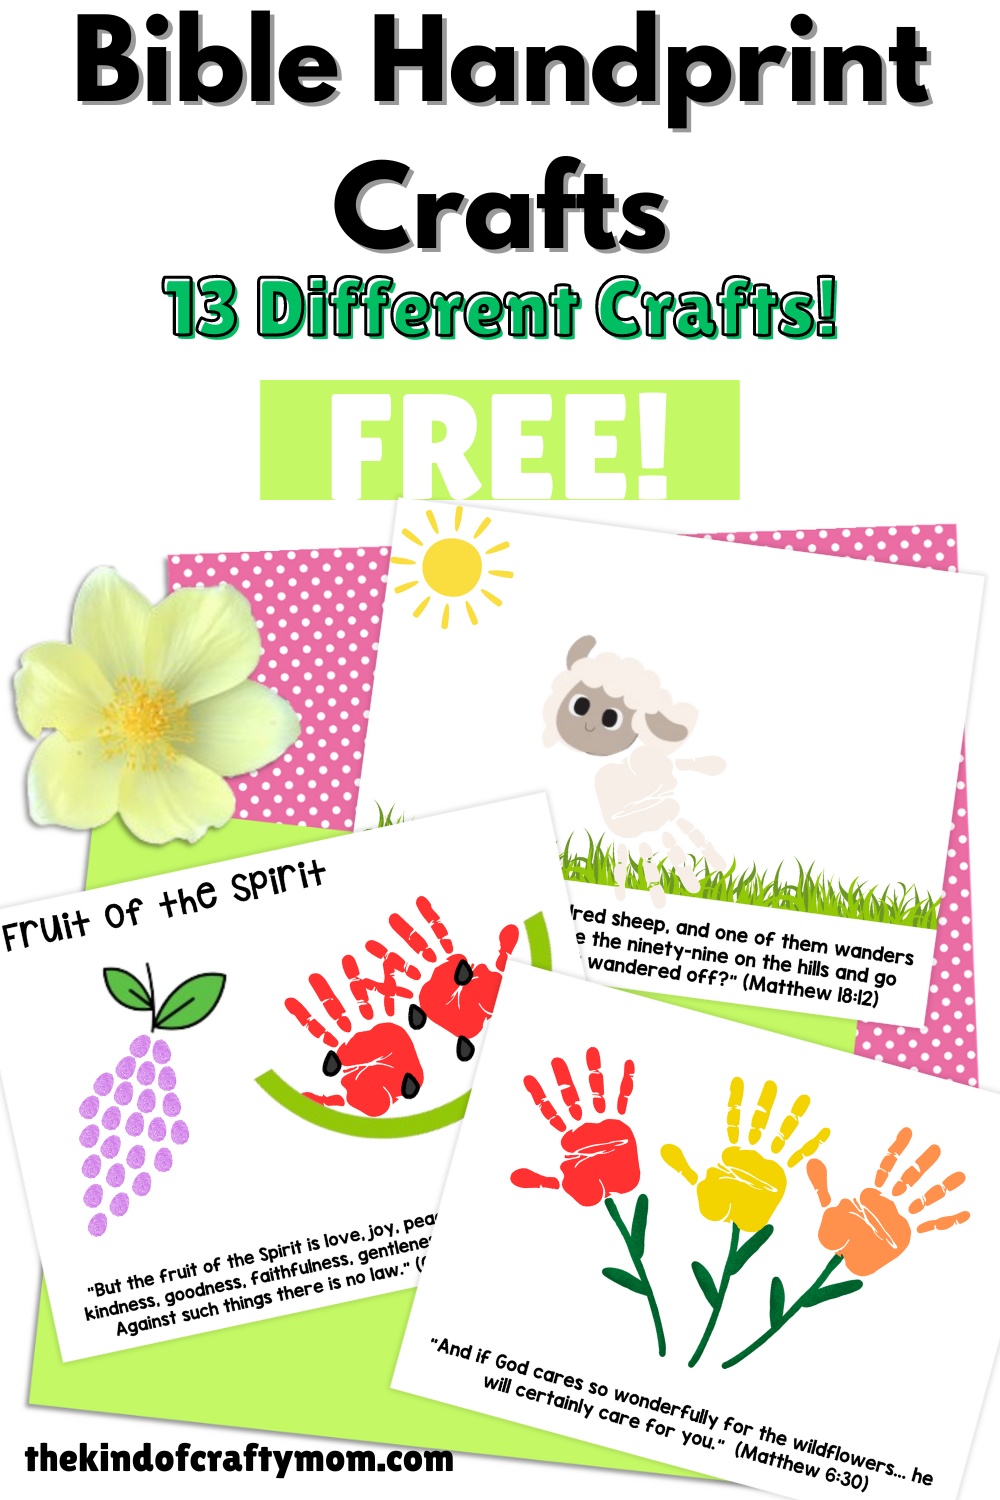
Want to download my 13 Bible Handprint Crafts - for FREE?
Just pop your email address into the form! You’ll be added to my email list, where I share even more ideas for teaching your little ones about Jesus, tips for making mom life easier, plus occasional freebies just for my email besties. And I’ll send these handprint crafts right to you!
Teaching our children about God and the Bible truly is one of the most important things we can do as mothers (or fathers, or grandparents, or teachers). And as a blogger, I’m so thankful to get to share a few small ways I do that in our home!
If you try any of these activities (or any of the other Bible-themed activities from my TPT shop), I would LOVE to hear about it! Comment below or tag me on Instagram so I can see what you and your little ones worked on!

Road Trip Essentials for Traveling with Kids

DISCLOSURE: THIS POST MAY CONTAIN AFFILIATE LINKS, MEANING I GET A COMMISSION IF YOU DECIDE TO MAKE A PURCHASE THROUGH MY LINKS, AT NO COST TO YOU. PLEASE READ MY TERMS OF USE POLICY FOR MORE INFO.
Are you planning on going on a road trip with little ones soon? Perfect! As a mom who has taken four different 12-hour road trips with kids under age 5, I’ve got all the best tips, ideas, and activities you need to make your trip bearable (and maybe even fun!).
The Top 6 Screen-Free Activities to Keep Kids Entertained in the Car

1 .Water Wow books - These are mess-free and kind of addicting! You can sometimes find them for cheap at the dollar store, but otherwise you can check out the Melissa & Doug version here.

2. Melissa & Doug reusable sticker books - These are an absolute favorite. Over the years we’ve had the princess, mermaid, and dress up themed books. Of course, they make them in all different themes -farm, safari, vehicles, and more!

3. Road Trip Fun activity pack - this activity pack from my store is so fun! It includes coloring activities, a road trip scavenger hunt, and fun preschool learning activities. None of the pages require anything other than crayons or markers so it’s car-friendly. Pro tip: hole punch and place it in a binder for easy access!

4. Colorforms sticker set - Again, you may be able to find some at the dollar store! Or of course you can click here to check out tons of different options on Amazon and choose your child’s favorite.

5. This coloring book and markers - Or any coloring book and markers or crayons, really. When all else fails, coloring is a fun and relaxing activity in the car. Your kiddo can either place their markers in their cup holder or in a chair back organizer in front of them (see below).

6. Toy catalog for circling favorite toys (from Amazon) - This is obviously seasonal, but whether you’re going on a road trip or not, save your Black Friday toy catalogs! This activity is an oldie but a goodie. Give your child a toy catalog and a pen and tell them to circle their favorites! If you didn’t receive a catalog, you may be able to order one during the holiday season - check it out here.
Other Products You’re Going to Want

Chair back organizer - We got this for Ella (my older daughter) last year and it was such a game changer. It has a spot for a tablet so she can watch shows in front of her (more on that in bonus tip #1, below), and lots of pockets for markers, toys, and other goodies.

Kindle or other tablet - I know I gave you a list of screen-free ideas, but you didn’t think our whole trip was screen-free, did you? In our family, road trips are a time to ease up on screen time rules. You can download shows and movies from Amazon and Netflix, so your child won’t need WiFi to watch!

Sun shades - These were so beneficial for both girls. They allowed Ruthie to nap better in the car, and Ella was able to see her shows better without the glare from the sun. And these ones are kind of like magic. They stick to your window without suction cups or anything. They work great!

Above car storage - We’ve spent Christmas in Georgia twice now, which means Santa visits us up there. As you can imagine, we had a LOT to transport! Whether you have gifts to transport or not, this above car storage is easy to use and gives you so much extra space.
Bonus tip #1: Hang the tablet for screen time!

We learned this tip the hard way on our very first road trip. Looking at a tablet in your lap can easily make you carsick! Poor Ella (who was 2.5 years old at the time) had a ROUGH time until I remembered a trick I’d seen online. We stopped and got some ribbon, and hung the tablet from the seatback in front of her. She felt better almost instantly!
These days we put the tablet in the chair back organizer I mentioned. Either way, hang that tablet so your little one isn’t looking down at their lap!
Bonus tip #2: Consider a hotel stay!
When we traveled with just one child, we had no trouble making it through the whole trip in one day. But after my second was born and we made the trip for the first time as a family of four (she was ten months old at the time), we realized it was too long of a day for her. Right now we are splitting the trip in two parts and staying at a hotel, a little bit past the halfway point. When both girls are a bit older, we’ll do the trip in one day again. It’s all about being flexible and leaning into the season of life you’re in!

So there you have it! My best tips for road tripping with toddlers. I would LOVE to hear about any other tips you have that I’ve missed! Comment below or message me on Instagram!

Easy and Fun Paper Plate Ocean Craft

Happy World Ocean Week! Whether it’s actually World Ocean Week when you’re reading this post or not, I’ve got a really fun ocean-themed craft to share with you today. It’s easy, unique, and you probably have all of the supplies at home already! (And if not, I’ve got a few links for you to some of my crafting favorites. 😀)
DISCLOSURE: THIS POST MAY CONTAIN AFFILIATE LINKS, MEANING I GET A COMMISSION IF YOU DECIDE TO MAKE A PURCHASE THROUGH MY LINKS, AT NO COST TO YOU. PLEASE READ MY TERMS OF USE POLICY FOR MORE INFO.
We created this adorable ocean-themed puppet craft using a paper plate, craft sticks, and some cardboard from my recycle bin. And of course, we decorated ours with our very favorite Kwikstix paint sticks (click here to check them out).
Materials needed:
Paper plate
Craft sticks (<— these Walmart ones are much cheaper than you’ll find on Amazon!)
Cardboard from recycle bin (you could also use cardstock)
Paint sticks (or washable paint, or markers)
Glue
A sharp knife and/or scissors
To create this craft:

I drew a line lightly with pencil, about half way down the paper plate, all the way across. Ella (my 5 year old) used this as a guide and then used our paint sticks to color the ocean background - half blue, half yellow (or gold).
I used a sharp knife to cut a slit in the plate where I had previously drawn a line. The slit shouldn’t go all the way across the plate - it should be about 3 inches wide, in the center.

3. The first thing I cut from our recycled cardboard was “seaweed”. This was just four tall, thin squiggly lines. Ella painted these green and then glued them onto the paper plate, being careful not to cover our slit.
4. I also cut out four fish shapes. I searched for “simple fish drawing” on Pinterest and used that to freehand my fish. Don’t overthink it!

5. Ella decorated the fish to her liking, and then we glued them onto craft sticks. The hardest part was right here - waiting for the glue to dry before playing with our cute new puppets!

6. Once the glue was dry, I slid one of the craft sticks through the slit on the paper plate. We were now able to make our puppets “swim” (and talk, and anything else our imaginations could come up with)!
This craft was easy, fun, and a perfect way to introduce the topic of Ocean Week!
Want to extend the learning with some ocean-themed books? Here are some great ones!:
Shark Lady by Jess Keating
Inky the Octopus by Erin Guendelsberger
Sully the Seahorse by Natalie Pritchard
Peek-a-Flap Ocean by Cottage Door Press
National Geographic Little Kids First Big Book of the Ocean by Catherine D. Hughes
And of course, you can keep the ocean themed learning going by checking out my fun Feed the Shark activity!

Will you try this craft? I would LOVE to see how yours turns out! Comment below or tag me on Instagram to show me!


How to Make Ice Cream in a Bag

It is HOT here in Florida right now… and my oldest is home for summer vacation, so we are in full-on summer mode!
And what better way to celebrate the season than with homemade ice cream?
DISCLOSURE: THIS POST MAY CONTAIN AFFILIATE LINKS, MEANING I GET A COMMISSION IF YOU DECIDE TO MAKE A PURCHASE THROUGH MY LINKS, AT NO COST TO YOU. PLEASE READ MY TERMS OF USE POLICY FOR MORE INFO.
We don’t have an ice cream maker (yet), but good news - you don’t need one to make your own ice cream at home!
Elementary school science teachers have been doing this for years, and yes, it really works.
With just a few ingredients that you probably already have at home (the only thing I needed to pick up was half & half, and I got some with my Walmart+ grocery order - you can sign up for a free trial by clicking here).
What You Need

1 cup of half & half
½ tsp vanilla extract
1 tbsp sugar
¼ cup salt
Ice (enough to fill a large Ziploc bag about ¾ way full)
Ziploc bags - 1 gallon sized, 2 sandwich sized
How to Make Your Ice Cream

Pour 1 cup of half & half into one of your small ziploc bags. Add in ½ tsp of vanilla extract and 1 tbsp of sugar. Seal the bag, making sure to let excess air out.
Place your bag with the ice cream mixture inside your other small baggie. Let the air out and seal that bag. (This step is to make sure you don’t end up with salty ice cream!)

3. Fill your large Ziploc bag at least halfway full with ice, and sprinkle the ¼ cup of salt onto the ice. Give the bag a shake.

4. Place your double-bagged ice cream mixture inside the large bag with ice. We added a little more ice and a little more salt on top. Then seal the large bag.

5. Now comes the fun part! You are going to SHAKE your large Ziploc bag, for six to eight minutes! I set a timer for eight minutes and then played some shake-themed music (see below - I’ve got a list for you!), and we took turns turning and shaking the bag. It’s going to get COLD, so feel free to wear oven mitts!
6. Carefully open the large bag and remove your double-bagged ice cream. Remember, the goal here is to not get any salt in your ice cream!

7. Open your small bags. You did it! Your final step is to eat and enjoy!
A Few Notes and Options
*I’ve read that you can use regular whole milk instead of half & half, the ice cream just doesn’t come out quite as creamy. We haven’t tried it, but if you do, I’d love to hear about how yours comes out!
*Want to make chocolate ice cream? Leave out the vanilla extract and sugar and add chocolate syrup instead!
*Using quality bags will most likely save you from making a mess. We used a cheap gallon sized bag (I think it was from the dollar store) and it leaked while we were shaking. It didn’t affect our ice cream at all but it did make a mess.
The Science (Why this Works)
Salt lowers the freezing temperature of water, making ice melt faster (that’s why they salt icy roads when it snows!). This is called freezing point depression. The ice pulls heat from surrounding sources - in this case, the ice cream mixture - in order to melt. This causes the ice cream mixture to freeze!
And as promised, some shake-themed songs for your ice cream shaking dance party
Shake it Off by Taylor Swift
Shake Your Booty by KC and the Sunshine Gang
Shake a Tail Feather by the Blue Brothers
Shake Your Groove Thing by Peaches & Herbs
Shake Your Pom Pom by Missy Elliott
Shake That by Scooter
Shake it Like That by Metro Station
If you make some homemade ice cream in a bag, I’d love to hear how yours turns out! Comment below or tag me on Instagram to tell me about yours!
—-> Looking for more fun ideas to do as a family over summer vacation? Make sure to check out my EPIC summer bucket list craft and idea list!


Twelve Things We’re Doing During the Summer Before Kindergarten
DISCLOSURE: THIS POST MAY CONTAIN AFFILIATE LINKS, MEANING I GET A COMMISSION IF YOU DECIDE TO MAKE A PURCHASE THROUGH MY LINKS, AT NO COST TO YOU. PLEASE READ MY TERMS OF USE POLICY FOR MORE INFO.

I absolutely cannot believe that I am about to be the mom of a kindergartener. How did this happen? How is this even possible? But it’s true! In about two months, my Ella will be off to kindergarten!

As a former teacher (I taught first, third, and fourth grade), I know that kindergarten these days is no joke. When I was in kindergarten thirty-plus years ago, my day consisted of mostly playing and meeting the Letter People… and it was only a half day. Now, kindergarten is a full day of rigorous learning!
My daughter has really thrived in preschool and although it’s nerve-wracking, I know she’s going to do well in kindergarten. Still, there are some things that we will be doing this summer (both academic and not) to help her feel even more prepared! So here it is: my list of the 12 Things We’re Doing During the Summer Before Kindergarten.
Reading every day — Studies have shown for years that one of the top predictors of student success is how often a child is read to at home. Fortunately, this one is pretty easy for us, and it might be relatively easy for you too if you already read a bedtime story or something similar. Here are some kindergarten-themed books that we’re going to make sure to read this summer:
Drawing and writing to label pictures — Okay, this is yet another easy one for us… because Ella is obsessed with drawing. Like, stacks of pictures everywhere obsessed. Whether your child is super into drawing or not, encourage them to draw a picture and label it and see how they do! For example, Ella loves to draw family portraits and write everyone’s name on the picture. If your child isn’t ready to write words on the picture themselves, that’s okay! You can help by writing labels on the picture for him or her.
**This Picture Story Paper would be perfect for drawing and labeling pictures!
Writing our first and last name — Ella has been able to write her first name independently for quite a while but we haven’t spent much time practicing writing our last name. This is a good opportunity to a) make sure your child KNOWS their last name and b) practice writing it, if they are up for the challenge.
Counting everything — The easiest way to practice math skills at this age is to make them part of everyday life. You can ask your child to count cars in a parking lot as you walk past them, candies in a jar, how many steps it takes to walk across the living room… the possibilities really are endless on this one!

This Feed the Candy Monster activity is perfect for counting and early math skill practice!
Wiping our own butt — This is definitely not the most glamorous item on the list. But it’s an important one! Children need to be able to use the bathroom independently in kindergarten. Busy Toddler has a blog post about HOW to teach your child to wipe their own butt. This truly is on our list of skills to master this summer!
Practicing cutting with scissors — The summer before I started kindergarten (again, we’re talking thirty-some years ago), my mom asked my kindergarten teacher what skills she should be practicing with me at home, and my teacher said, make sure she knows how to hold a pencil and cut with scissors. Years later, these certainly aren’t the ONLY skills your child needs to be ready for kindergarten, but they’re still important! Ella is pretty confident in this area but it’s certainly a skill worth practicing.
Reviewing letters and the sounds they make — If your child doesn’t know all of their letters and letter sounds going into kindergarten, that’s okay! But to be honest, the more they DO know, the better. And if you’re looking for some fun activities for practicing letter recognition, I’ve got you covered. Check out some of these hands-on resources for fun ways to learn about letters and beginning reading skills:


Talking about shapes — Again, this doesn’t have to be super formal. Talk about shapes you see in the real world. Circles, squares, triangles, rectangles, pentagons, hexagons, octagons. Where can you find them in everyday life?

We love this Feed the Shark activity for fun 2D shape practice!

Click here to read more about how we’ve used this activity!
Practicing opening foods for lunch — In preschool, your child most likely ate lunch in his or her classroom, with his teacher right there. In kindergarten, that most likely won’t be the case! For most children, kindergarten is the first time eating lunch in a big cafeteria. Yes, there are some adults available to help with things like opening juice boxes and chips, but they may not be as readily available as your child is used to. Spend this summer helping your child learn to open the foods that will be in their lunch box… and then if you find that some things are really hard for them to open, give some thought to whether you want to include those in their lunch or not!
Getting clothes and shoes on and off independently — Can your child button their own pants? Tie their shoes? Ella and I will be fine-tuning her skills this summer. And no, children don’t HAVE to be able to tie their shoes independently in kindergarten! But it’s certainly worth working on and getting them as close to independence as possible.
Talking about what kindergarten will be like — This is going to be a huge one for us. Ella thrives on routine and knowing what’s coming next. And so many things about kindergarten are going to be brand new to her! So, we will spend a lot of time this summer just talking about kindergarten. What will her school be like, what will morning drop-off and afternoon pick-up look like, the cafeteria, recess, PE class… any details we can talk about will help her feel more confident about the upcoming school year!
Play, play, play! — Yes, I want my baby to feel confident and ready for kindergarten. But I also want her to soak up every minute of being five years old and having FUN! Be sure to take plenty of time to have fun and ENJOY your child this summer. Make memories, get outside, go on adventures, and PLAY!
Looking for some ideas on how to make your summer even more fun? Check out my list of 90 summer bucket list ideas!
So there it is. The 12 things we’ll be doing during this summer before kindergarten. Is there anything you think I missed? How will you be implementing these ideas? Comment here on the blog or come tell me on Instagram what you think!


Create an Epic Summer Bucket List
Ahh, summertime! No school, warm weather, longer days… Just the thought of summer brings a smile to my face! But if you have young kids at home, you might be wondering what you’re going to do with them all summer.

Insert the summer bucket list! This fun tradition is a way to plan for summer and highlight a few activities you’re looking forward to. It’s also a perfect way to get kids excited about the next few months!
DISCLOSURE: THIS POST MAY CONTAIN AFFILIATE LINKS, MEANING I GET A COMMISSION IF YOU DECIDE TO MAKE A PURCHASE THROUGH MY LINKS, AT NO COST TO YOU. PLEASE READ MY TERMS OF USE POLICY FOR MORE INFO.

There are lots of ways you can create a summer bucket list, but my favorite way is with this fun craft. It includes multiple templates for writing or drawing lists, so it’s perfect for kids of many different ages. And it also includes a bonus copy of the list of ideas you’re about to read!
If you’re looking for some inspiration for your summer bucket list, I’ve got you covered! Below are 90 ideas for your summer bucket list. They are roughly organized by category - outdoor, excursions, food, and indoor.

I hope this list serves as a starting place for you to dream up your own summer bucket list! You can use these ideas to create a plan for making wonderful memories this summer!
Go to the park
Swim in a pool
Do a cannonball
Build a sandcastle
Collect seashells
—> Be sure to read my post here!: Nature Scavenger Hunt (Freebie!)

7. Play in a sprinkler (we love this one!)
8. Blow bubbles
9. Look at the stars
10. Eat lunch outside
11. Draw with sidewalk chalk
12. Jump rope
13. Climb a tree
14. Watch a sunset
15. Have a water balloon fight (try these reusable water balloons)
16. Go for a bike ride
17. Fly a kite
18. Have an outdoor movie night
19. Ride a scooter
20. Play hopscotch
21. Have a bonfire
22. Watch fireworks
23. Play on a slip-n-slide
24. Feed some ducks
25. Catch lightning bugs
26. Play in the rain
27. Wash the car
28. Play hopscotch
29. Use a hula hoop
30. Have a water gun fight
31. Ride a ferris wheel
32. Create & complete a backyard obstacle course
33. Go bowling
34. Go to the zoo
35. Back to school shopping
36. Visit an amusement park
37. Go camping
38. Stay in a hotel
39. Play mini golf
40. Go fishing
41. Go to the beach
42. Take a road trip
43. Visit the aquarium
44. Go to a splash pad or water park
45. Go to a county fair
46. Volunteer in your community
47. Play at an indoor jump park
48. Explore a museum
49. Go on a boat ride
50. Go to a concert
51. Go to a parade
52. Visit the library
53. Go berry picking
54. Visit a state or national park
55. Have a park picnic
56. Go hiking
57. Bake cookies
58. Make homemade ice cream

Click here to read about how to make homemade ice cream in a bag!
59. Go to an ice cream shop
60. Have an ice cream sundae party
61. Have a barbeque
62. Make s’mores
63. Make homemade popsicles
64. Try a new food
65. Make lemonade
66. Grow food in a garden
67. Visit an ice cream truck
68. Bake a cake
69. Learn a new skill
70. Read a book
71. Clean your room
72. Play a new board game
73. Make tie-dye shirts
74. Complete a puzzle
75. Color a picture
76. Learn to juggle
77. Build a blanket fort
78. Paint a pet rock
79. Have a pajama day
80. Learn a magic trick
81. Have a family game night
82. Take a bubble bath
83. Write a letter and mail it
84. Create a puppet show
85. Learn the sign language alphabet
86. Do random acts of kindness
87. Donate old clothes & toys
88. Do a science experiment
89. Make friendship bracelets
90. Have a Disney movie marathon
So tell me - which items are definitely going on your summer bucket list? Comment below or message me on Instagram. I can’t wait to hear!
P.S. -Most of the links I share in this post are Walmart links. Want to get these items delivered to your house, for free (in most cases, TODAY)? We started using Walmart+ earlier this year and I swear I’ll never go back. Free shipping on everything, and free same-day delivery for orders over $35. You can start a free trial here!

How To Throw an Epic Harry Potter Themed Baby Shower
As the oldest of four girls, my mom, my sisters, and I have some experience throwing showers, and we really believe the magic is in the details. Last weekend, we threw a Harry Potter themed baby shower for my youngest sister. Dreaming up details for this theme was so much fun!
DISCLOSURE: THIS POST MAY CONTAIN AFFILIATE LINKS, MEANING I GET A COMMISSION IF YOU DECIDE TO MAKE A PURCHASE THROUGH MY LINKS, AT NO COST TO YOU. PLEASE READ MY TERMS OF USE POLICY FOR MORE INFO.
Golden Snitches
The golden snitch is a Harry Potter staple, and these chocolate snitches couldn’t be easier to put together! Ferrero Roche chocolates with wings cut from cardstock and glued on make the perfect golden snitches.

Chocolate Frogs
My sister used a silicone frog mold and chocolate melting candies to make these chocolate frogs. They came out so cute and were delicious, too!

Screaming Mandrakes
This was quite possibly everyone’s favorite detail from the whole shower, and it was deceptively easy to make! We put a chocolate cupcake inside a small flower pot, and used a stone for our Screaming Mandrake. We drew a little face with a Sharpie. Add some lettuce for hair, and your Mandrake is good to go!

Professor Sprout’s Garden
We turned our charcuterie board into Professor Sprout’s Garden! The small white picket fence came from Hobby Lobby, and a head of lettuce in one corner and a “Professor Sprout’s Garden” sign in another tied it all together!

Magic Broomsticks
Another EASY and festive DIY! Mini peanut butter cups and pretzel sticks are all you need to make the perfect broomsticks for your party.

Accio Donuts
To make this fun donut display, we taped an empty Amazon box shut and wrapped it in brown kraft paper. Then we wrote “Accio Donuts” on one side and pushed (clean) nails in at a slight angle. The mini donuts hung perfectly!

It’s MimOsa Not MimosA
Are you team adult beverages at baby showers? We are! This fun sign was an easy way to tie in our theme at our mimosa bar!

Sign Baby’s First Harry Potter Book
You could easily just grab a copy of Harry Potter and the Sorcerer’s Stone and that would work well for this cute activity too. But we found this Harry Potter Fill-In Book and it was perfect for having everyone sign the inside front cover!

Baby Making Potion Favors
Our favors for party games were a fun play on “potions”. These “Baby Making Potions” included a small bottle of margarita mix, and one of tequila!

9 ¾ Pregnant Sash
I ordered a plain sash from Amazon and whipped this up with my Cricut in no time flat. (Amazon also has these already made, too!) My sister, Emily, looked adorable wearing it!

Welcome Baby Muggle Sign
This is one of the few items on the list that wasn’t a DIY - this cute banner came from Amazon! It wouldn’t be hard to DIY a similar one, though!

Harry Potter Onesies
I made these fun baby bodysuits and we hung them on a clothesline with baby socks for a festive decoration. Of course, baby boy will get to wear them later on! (Read about how I made these HERE!)


“Don’t Say Baby” House Ties
If you’ve never played the “Don’t Say Baby” game at a baby shower, the traditional game involves wearing a clothespin on your shirt, and if someone catches you saying the word “baby”, they get to steal your clothespin! The person at the end of the shower with the most clothespins is the winner!
We put a Harry Potter spin on the game by creating ties in the color of the four houses. We cut the ties from felt and hot glued stripes on, but you could also print yours out (these ones from Etsy are so cute).

Sorting Hat Scratch Offs
This was the only other non-DIY - we bought these cute scratch off tickets from Etsy and people scratched to see what house they would be sorted into! (Also featured in this photo: adorable baby pics of the mom- and dad-to-be!)
P.S. -Most of the links I share in this post are Walmart links. Want to get these items delivered to your house, for free (in most cases, TODAY)? We started using Walmart+ earlier this year and I swear I’ll never go back. Free shipping on everything, and free same-day delivery for orders over $35. You can start a free trial here!


How To Make a Onesie with Your Cricut
Last weekend we hosted a Harry Potter themed baby shower for my youngest sister! As the crafter of the family, I was in charge of making some cute onesies to display at the shower (and then, of course, for baby boy to wear later on!).

DISCLOSURE: THIS POST MAY CONTAIN AFFILIATE LINKS, MEANING I GET A COMMISSION IF YOU DECIDE TO MAKE A PURCHASE THROUGH MY LINKS, AT NO COST TO YOU. PLEASE READ MY TERMS OF USE POLICY FOR MORE INFO.
I decided this was the perfect opportunity to share a tutorial! Using your Cricut and heat transfer vinyl, you can easily make personalized baby onesies, shirts, and so much more.
If you’ve been on the fence about buying a Cricut, this is your sign! There is a bit of a learning curve but once you get the hang of it, creating with your Cricut can be fun and easy. And BONUS - I’ve got a tip that makes it so much easier!
Gather Your Materials
Cricut (I use the Cricut Maker 3 but if you know you’re going to stick to small designs like baby body suits, you could get the Cricut Joy)
Cutting mat
Heat press (it is possibly to do this with a household iron - I did it for months - but it’s much harder! This is the heat press I have and it’s saved me SO much time.)
——> Again, if you know you’re planning on sticking to smaller projects, you could grab a mini heat press
Heat press mat
Heat transfer vinyl
Weeding tool (I have a set like this one)
Creating Your Design
The first thing you’ll want to do is open Cricut Design Space. This is the free program that you were instructed to download when you first set up your Cricut, and it’s where you’ll design all of your projects. You can browse their image library, or upload a design that you created in Canva, or you can purchase one from somewhere like Etsy. Size your image and hit “Make.”

Etsy is a great place to find cute images!

Editing and sizing my image after uploading it to Cricut Design Space.
Follow the steps on screen (be sure to turn on “Mirror Image”), and apply your vinyl to your cutting mat. Make sure the shiny side is facing down! Insert the mat into your Cricut machine. Cricut walks you through how to cut your vinyl.


Cutting and Weeding Your Image
HERE’S MY TIP for making things so much easier: after you’ve cut the vinyl, DON’T REMOVE IT FROM THE MACHINE YET. Don’t touch it! Press the “go” button again, and it will cut the design again. This makes for a deeper cut, and makes it SO much easier to weed your vinyl! Before I learned this trick, I had SO much trouble weeding my designs.

After you’ve cut your design TWICE, you can remove it from your Cricut and peel the vinyl from the mat. Now you’re ready to weed your design! Using your weeding tool, find a spot to start peeling away at the excess vinyl. It should be relatively easy since you cut twice!


Once you’re done weeding, you’re ready to iron on your design! You can use a regular household iron - I did it for quite a while - but it’s a lot more challenging. Using a heat press makes the process MUCH easier. I have this one, but you could try a smaller one like this, especially if you know you’re going to stick to small projects like onesies.
Applying Your Design
Head back to Cricut Design Space and find the Cricut Heat Guide. You can enter the type of materials you’r using and they’ll tell you exactly how hot to make your heat press and how long to press for.

Preheat your onesie, line up your design carefully on the front, and you’re ready to go!

After you use your heat press (following the directions from the Cricut Heat Guide), you’re ready to peel off the plastic backing from your onesie. Go slow and peel at an angle down against the shirt. If the vinyl doesn’t stick to the shirt, you may need to use the heat press again.
And that’s it - you did it! Congratulations on DIYing your very own onesie! Once you’ve mastered this technique, the possibilities really are endless for what you can create!

Looking for more fun crafts you can do with your Cricut? Check out this blog post about creating a DIY Personalized Hand Sanitizer craft!
P.S. - The links I shared in this post are all Walmart links. Want to get these items delivered to your house, for free (in most cases, TODAY)? We started using Walmart+ earlier this year and I swear I’ll never go back. Free shipping on everything, and free same-day delivery for orders over $35. You can start a free trial here!


Nature Scavenger Hunt (Freebie!)

DISCLOSURE: THIS POST MAY CONTAIN AFFILIATE LINKS, MEANING I GET A COMMISSION IF YOU DECIDE TO MAKE A PURCHASE THROUGH MY LINKS, AT NO COST TO YOU. PLEASE READ MY TERMS OF USE POLICY FOR MORE INFO.
I don’t know about you, but I’m always looking for new ways to get my kids playing outside. And when I find one that’s fun for everyone AND leads naturally into great independent play afterwards? Well, I call that a win!
If you’re looking for new ideas for getting your kids moving outside, you’re going to love this. (Keep reading to learn how you can snag one for FREE!)


I created this nature scavenger hunt last summer, and my then four year old enjoyed it so much we did it several days in a row - in the 95 degree Florida heat!

The scavenger hunt includes two pages for a total of 32 items to search for. I recommend either laminating it or sliding it into one of these dry erase pouches. That way you can use a dry erase marker and complete it over and over again!

One of my favorite parts was that after we hunted for items on the list together, Ella would naturally start playing independently- making flower soup or “potions”.


Ready to download your free copy? Enter your email address below and I’ll send it right to you!
P.S. - Want even more ideas for outdoor play? Check out my list of the best outdoor toys for kids here!

Feed The Shark Shape Matching Activity

Here at The Kind of Crafty Mom, we love to have fun. And we love to learn!
My five year old, Ella, has spent quite a bit of time learning about 2D shapes in her Pre-K class this year. So I thought, what better than a hands-on “Feed the Shark” activity to reinforce her learning?
DISCLOSURE: THIS POST MAY CONTAIN AFFILIATE LINKS, MEANING I GET A COMMISSION IF YOU DECIDE TO MAKE A PURCHASE THROUGH MY LINKS, AT NO COST TO YOU. PLEASE READ MY TERMS OF USE POLICY FOR MORE INFO.
Supplies I used to create this setup:
Feed the Shark printable activity
Laminator & lamination sheets (if you don’t own a laminator yet, I LOVE this one. It’s by Amazon Basics and it works just as well as the more expensive name brand ones!)
Paper bag
Scissors
There are lots of ways you can set up the shark to feed him - for example, gluing him to a cardboard box also works great! I chose to use a brown paper bag.

Ella and I took turns matching a plain blue card and a fish card, and naming the shapes. We also had LOTS of fun making silly noises when we fed the shark!


More possibilities that would be so fun with this activity…
Place the shape cards in dyed blue rice to turn this activity into a sensory bin!
Print & assemble two sharks instead of just one. Play a memory matching game. Whoever feeds their shark the most pairs wins!
Want to see more fun hands-on learning activities? Check these out!:


If you try this activity, tag me on Instagram (@kindofcraftymom) and let me know how yours turns out!

DIY Personalized Hand Sanitizer Craft

Can you believe Teacher Appreciation Week is less than two weeks away? Time is FLYING!
As a former teacher, I like to think I have a pretty good idea about what teachers really want to receive as gifts. And I can tell you what it’s not: more mugs, candles, or lotion sets.
Don’t feel bad if you’ve given these gifts before! We really do appreciate each and every gift and we’re thankful you’re thinking of us at all. But if you want to know the formula for the perfect teacher gift, I’ve got it for you! -
Something useful + a gift card!
The “something” useful can be small, and it can be edible (or drinkable). It could also be something for the classroom like pens, stationary, or in this case… hand sanitizer!
Today I’m bringing you a fun Cricut craft that any teacher is sure to love. Personalizing a bottle of hand sanitizer makes it fun and special- and the teacher in your life can refill it to use it again and again!
And if you DON’T own a Cricut yet… I highly recommend buying one! I know it’s a bigger purchase, but the possibilities of what you can create are endless! Click here to purchase one!
DISCLOSURE: THIS POST MAY CONTAIN AFFILIATE LINKS, MEANING I GET A COMMISSION IF YOU DECIDE TO MAKE A PURCHASE THROUGH MY LINKS, AT NO COST TO YOU. PLEASE READ MY TERMS OF USE POLICY FOR MORE INFO.
Supplies I used:
Hand sanitizer (I got mine from Dollar Tree)
Cricut Maker 3
Permanent vinyl
Weeding tool & scraper (I have this Basic Tool Set)
Transfer tape
Ribbon
Printable gift tag
How to Create a Personalized Hand Sanitizer Gift:
I started by peeling the label off of the front of the sanitizer bottle, and making sure the surface was clean and dry.

I then went into Cricut Design Space and designed a label I liked with my daughter’s teacher’s name and a small flower. I cut the design on red permanent vinyl and used my weeding tool to weed the design.

Once I had weeded my design, I used transfer tape to move the design onto the sanitizer bottle. Make sure to use your scraper to smooth the transfer tape!


Finally, I carefully peeled off the transfer tape, added a ribbon and a gift tag — and perhaps most importantly, added a gift card to go with it!

I’d love to know- is this a DIY project you would try? If you do, tag me on Instagram (@kindofcraftymom) and let me know how yours turns out!
Looking for more fun crafts you can do with your Cricut? I’ve got you! Check out my tutorial on creating a personalized onesie with your Cricut here. I share my BEST tip for weeding over there, too!


The Best Outdoor Toys for Toddlers
You’re gonna want these outdoor toddler toys!

Imagine this - your kids are outside, playing happily. You’re sitting close by sipping your iced coffee and reading a book, or maybe you’re watching them play through the kitchen window. When it’s finally time to call them in for lunch, you’re met by a chorus of “Aww, man!”’s. Sounds dreamy, right?
Summer is right around the corner, and if you’re anything like me, you’re hoping to get your kids playing, using their imaginations, and having fun outside!
I’ve compiled a list of some of the best outdoor toys that will help you do just that! Many of these are toys that we’ve had and enjoyed for years.. And the rest are on our own wish list!
DISCLOSURE: THIS POST MAY CONTAIN AFFILIATE LINKS, MEANING I GET A COMMISSION IF YOU DECIDE TO MAKE A PURCHASE THROUGH MY LINKS, AT NO COST TO YOU. PLEASE READ MY TERMS OF USE POLICY FOR MORE INFO.

Step2 Roller Coaster
We’ve had this gem for years, and it never gets old! Starting at about age one, your little one can ride with assistance.. And it’s still a hit at age five (and beyond)!

Play House
Every backyard needs a play house. So much wonderful pretend play happens in ours! My girls have even shared picnic lunches inside the playhouse together!

Water Table
Scooping, pouring, pretend play, splashing… our water table is an absolute staple in our Florida backyard. Keep it simple or come up with fun themed water table playscapes. The possibilities are endless!

Flower Sprinkler
No list of outdoor toys would be complete without a sprinkler! We’ve owned this Melissa & Doug flower sprinkler for four years and it’s a real winner. A classic way to stay cool this summer!

Kiddie Pool
Ahh, the kiddie pool. There are so many different options you could go with. We’ve tried a few different ones, but we’re loving the simplicity of this 4-foot pink blowup pool right now!

Splash Pad
I feel like the splash pad is the perfect blend of sprinkler and kiddie pool. Perfect for running through, or sitting down to get all the way wet. Add some of your child’s favorite toys for a fun twist!

Reusable Water Balloons
If you haven’t tried these reusable water balloons yet, you’ve got to get your hands on some! Kids can fill them up independently by dunking the balloon underwater and closing it with the magnetic closure. Note: make sure you get the kind with the fully enclosed magnets. Exposed magnets could be a choking hazard!

Slide
What toddler doesn’t love playing on the slide? Bring this classic into your backyard for hours of endless fun. Pro tip: have the slide lead into your kiddo pool for a water slide party!

Cozy Coupe
Who remembers playing with this gem as a kid? Your little one will live driving around in style in their Cozy Coupe. And today there are so many fun colors and designs to choose from!

Mud Kitchen
You can buy an actual mud kitchen or use a cheap play kitchen, but either way, you NEED an outdoor kitchen! Potions, flower soups, mud cakes - the imaginative play possibilities are endless!

Basketball Hoop
This one is almost as fun for the grownups as it is for the kids. In fact, I remember when my older daughter got hers on her second birthday - the dads in the group commandeered it for the rest of the birthday party! But for kids and grownups alike, a basketball hoop is a fun way to get moving outdoors!

Bubble Lawn Mower
Bubbles are always an outdoor win. We don’t have this exact bubble lawn mower, but it’s definitely going on our list! The fun is two-fold: bubbles are awesome, and a toy lawn mower makes for great imaginative play.

Swing
I wish we had better trees in our yard! When we’ve played at a friend’s house who had one of these swings, it was such a hit. And this one’s rated for kids up to 50 pounds!

Balance Bike
Another toy that we don’t own but I’ve heard the best things about. Balance bikes are excellent for learning how to maneuver on a bike, without worrying about pedaling.

Chalk
This is by far the simplest item on today’s list, but really, could a list of outdoor toys be complete without some sidewalk chalk? You can go simple or elaborate, but make sure you have some chalk ready for your outdoor play!


The Very Best Books for Your One Year Old
The best books to read to your one year old!

You probably already know that reading to your one year old is so important. But what are some of the best books you can read? Keep reading - I’m going to tell you!
As a former elementary school teacher, I am passionate about children being read to at a young age. The benefits are seemingly endless - young children build language skills, learn about the world, and more. Some studies have even shown that being read to is a predictor of future academic success! Now, as a mom to two girls, I’ve collected a list of books perfect for reading to your young toddler (starring the absolute favorites in our home).
DISCLOSURE: THIS POST MAY CONTAIN AFFILIATE LINKS, MEANING I GET A COMMISSION IF YOU DECIDE TO MAKE A PURCHASE THROUGH MY LINKS, AT NO COST TO YOU. PLEASE READ MY TERMS OF USE POLICY FOR MORE INFO.
What makes a book perfect for a one year old?
Board books - It’s no secret that one year olds aren’t exactly gentle with their belongings. Look for books that can hold up to being dropped, chewed on, thrown, and more.
Predictable, repetitive text.
Sensory/touch-and-feel books are fun to read and play with.
Musical books with buttons that play sounds will delight your child!
Lift-the-flap books are engaging and encourage fine motor skills, too.
Poke-a-Dot books are fun and the “dots” are so satisfying to press!
So without further ado - here are some of our very favorites!
Our Top 10 Tried-and-True Books for One Year Olds and Young Toddlers:

Poke a Dot: The Wheels on the Bus Wild Safari
When I first saw these Poke a Dot books all over Instagram, I was skeptical. The little “dots” are just plastic! They don’t play music or anything like that. Could they really be as engaging for kids as people said? YES. Yes they could. Both my one year old and my five year old LOVE poking the dots in these books! It makes a very satisfying “click”, and the little buttons are easy enough for little hands to poke independently. This particular book has a fun safari-themed rendition of “The Wheels on the Bus.” We love it!

The Very Hungry Caterpillar
Such a classic! The predictable pattern and bright colors are perfect for one year olds. My girls both love this one!

Green Eggs and Ham
This book is an absolute favorite in our house. Rhyming, silly, a Dr. Seuss classic. And just when I thought Green Eggs and Ham couldn’t get any better - A SILLY SOUNDS VERSION EXISTS. A young toddler’s dream come true!

Brown Bear Brown Bear, What Do You See?
Ella (my five year old) can recite this whole book from memory. The predictable, repetitive text is excellent. She reads it to Ruthie (my one year old) by herself. This classic also features beautiful bright pictures and teachers colors and animals… what’s not to love?! We own this slide-and-find version and it’s so fun!

That’s Not My Unicorn…
This is just one book in the “That’s Not My…” series, and all of them are perfect for one year olds. These touch-and-feel sensory books feature fuzzy, scratchy, bumpy, and smooth pages and repetitive text. Fun to read and play with!

Never Touch a Polar Bear
Another book from a fun series. The “Never Touch a…” are also sensory touch-and-feel books, and they are silly too!

Moo Baa La La La
Sandra Boynton books are fun and silly and the illustrations are sweet. This one is sure to make your kiddo smile!

God Made You Special!
This VeggieTales book is a household favorite. It features the lyrics to a Veggie Tales song and the pictures are bright and inviting. Perfect for reading to your little one and teaching them about God’s love!

Pig the Pug
Pig the pug is selfish, stubborn, and oh so funny! We are obsessed with these silly rhyming books, and so excited that they come in board books, too!

Jesus Loves Me
This picture book version of the classic song has sweet pictures that your little one will enjoy, and it’s perfect for reading and singing to your one year old!
Of course, the possibilities are endless when choosing books to read with your one year old. And I don’t know about you, but I don’t believe you can ever really have too many books!
Even More Great Books for One Year Olds:
I Love You, Every Little Bit
Baby Colors
Goodnight Moon
We’re Going on a Bear Hunt
Guess How Much I Love You
Dear Zoo
Poke a Dot Farm Animals
That’s Not My Dog…
Never Touch a Shark
On the Night You Were Born
Doggies
Noisy Farm
The Pout Pout Fish
Where’s Spot
Jesus Loves Me Songbook
Elmo’s Farm Friends
